How to Build a 100% Leak Proof Shower: An NYC Pro’s Guide
Master the modern, monolithic waterproofing system to guarantee a shower that never leaks.
Get a Free Quote
The anatomy of a fully waterproofed, code-compliant shower system.
Last Updated: November 18, 2025
In renovation, a leaky shower is the ultimate nightmare. In a high-density environment like New York City, it is a liability that can lead to water damage claims, mold, structural decay, and expensive litigation from neighbors below. Traditional shower building methods—using plastic liners and mud beds—have too many failure points. Water always wins.
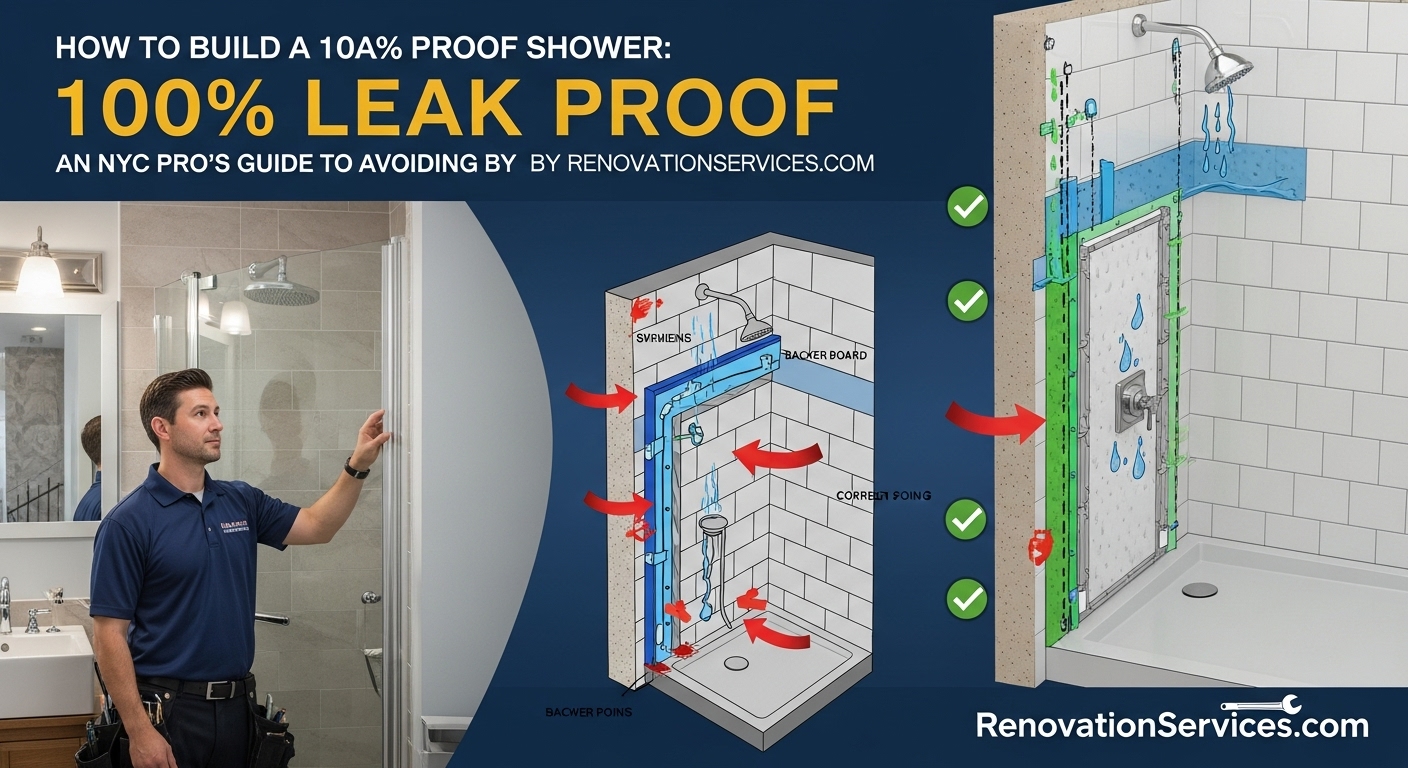
The only way to build a shower that is truly 100% leak-proof is to embrace modern, monolithic waterproofing systems. These systems, utilizing materials like pre-sloped foam pans and waterproof foam wall board (Kerdi or Curie board), replace traditional porous materials entirely. This comprehensive guide walks you through the professional installation of this system.
Key Takeaways from This Guide
- **Level, Square, Plumb:** The shower space must be structurally perfect before any installation begins.
- **Monolithic System:** The walls and pan must connect seamlessly using waterproof membranes or sealants.
- **The Pan-to-Wall Joint:** This is the #1 failure point. It must be sealed with a flexible, high-grade sealant (like Kerdi-Fix).
- **Wet Shimming:** Use thin-set behind the wall board to “shim” crooked studs in older NYC framing.
Section 1: The Triple Check: Level, Square, and Plumb
The entire integrity of a pre-fabricated shower system depends on the accuracy of the rough opening. In older New York buildings, walls are rarely straight.
Checking Level and Surface Condition
The subfloor where the pan sits must be flat. Use a long level across the space. If you find voids deeper than **3/8 of an inch**, they must be filled or peaks must be ground down.
- **For Concrete Slabs:** Use a grinder with a diamond cup wheel to shave down high spots.
- **For Wood Subfloors:** Use self-leveling compound to fill low spots. Ensure your subfloor is structurally rigid.
Plumb and Square Walls
Use a large square and a level to check your wall framing. If your walls are out of square, the pre-fabricated pan will not fit correctly, leaving an unsightly gap.
Interactive Tool: Shower Pan Fit Checker
Use this to determine if your rough opening is suitable for a standard pre-fabricated pan.
Section 2: The Shower Pan Installation
The shower floor is the single most leak-prone area. Using a tile-ready foam pan eliminates the risk of an improperly pitched mud bed.
Setting the Pan with Thin-Set
The pan is set into a bed of modified thin-set mortar.
- **Combing:** Apply thin-set to the subfloor using a directional combing technique.
- **Solvent Weld:** Apply PVC or ABS solvent and glue to the drain pipe and the interior of the pan’s drain fitting.
- **Setting:** Drop the pan straight down into the space. Gently wiggle to collapse the ridges.
- **Final Check:** Place a level across the pan and tap down gently with a rubber mallet.
Section 3: Wall Board Installation
Replacing porous gypsum board with waterproof foam board (like Kerdi/Curie board) provides the second layer of the monolithic envelope.
Interactive Tool: Wet Shim Gap Assessment
Enter the largest gap between your stud and the board to see the amount of thin-set needed to level the wall.
The Wet Shimming Technique
If your wall is not plumb, simply screwing the foam board in will cause it to bow.
- Apply dabs or ribbons of thin-set mortar behind the foam board (on the low spots).
- Press the board onto the wall and screw it in place **without fully sinking the screws**.
- Use a long level and gradually tighten the screws, forcing the board into the wet mortar until plumb.
Section 4: Sealing Every Gap
Once the pan and walls are installed, waterproofing is about sealing every seam, corner, and penetration.
The Critical Wall-to-Pan Joint
The joint between the bottom of the wall board and the pan must be sealed with a **flexible, pure waterproofing sealant** like Kerdi-Fix.
- Run a generous, thick bead of the sealant along the entire joint.
- Press the sealant firmly into the joint to fill the entire gap.
Interactive Tool: Waterproofing System Builder
Select the type of membrane system you are using.
Section 5: FAQ & Compliance
Interactive Tool: Leak Test Checklist
- Seal the drain pipe temporarily (test plug).
- Fill the shower pan with water up to the curb.
- Mark water level; wait 24 hours.
- Check if level dropped > 1/4 inch.
- Drain and allow to cure.
1. What is the most common point of shower failure?
2. What is ‘wet shimming’ and why is it necessary?
3. Can I just use regular green board?
Guaranteeing a Lifetime Leak-Free Shower
Building a truly waterproof shower is too important to leave to chance. Our licensed and certified New York City renovation teams specialize in installing these monolithic waterproofing systems.


